 Directions
Is it free to enter? YES for kids!
Nominal charge for:
OAPs
NHS
Locals (SY Postcodes)
Refugees
Food Bank Users
Armed Forces
Blue Badge Holders
Carers
Facebook Top Fans
£6.00
KIDS ALWAYS FREE!
Routine Adult Peak Season Charge: £8.50
Are you open on a Saturday? YES!
Do you allow dogs? YES!
(All outdoor spaces and outdoor café area)
Something for all the family!
(Please refer to our terms and conditions for more information)


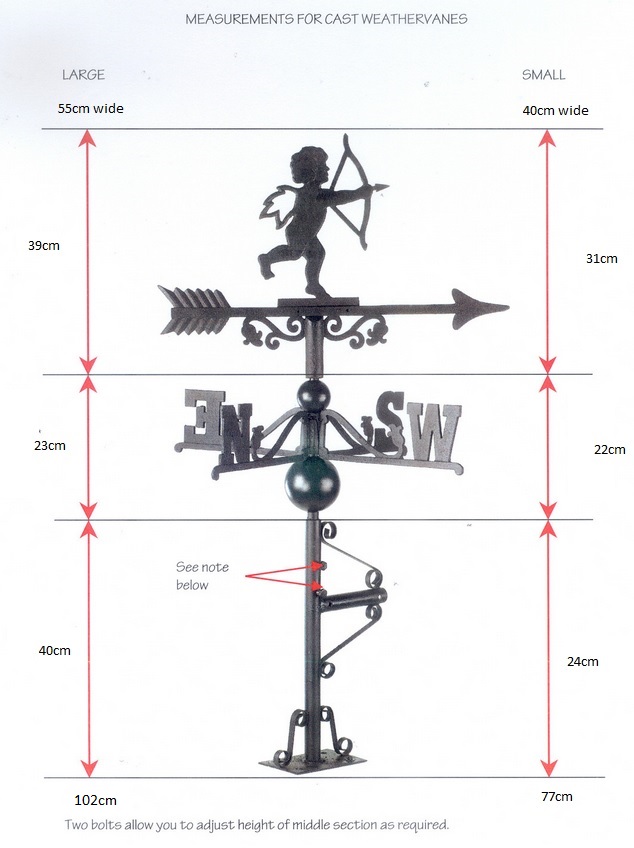
Weathervane Information Guide
This guide details everything that you need to know regarding weathervane positioning and installation.
We suggest you follow the succeeding points in order to successfully maintain your weathervane:
1. Light engineering grease is recommended for the shaft and within the shaft sleeve (tube)
2. The shaft sleeve should be clear of dirt or debris
3. The shaft itself has a point on which it rotates this point should be sharp (not blunt) or damaged.
4. Mounting locations are important, to fit your vane within a clear and open space is vital (we recommend the use of a qualified tradesperson).
5. To protect from corrosion and to keep the sharp/attractive finish, annual (or as required) repainting is recommended using any metal based paint in matte black or any colour of your choice.
Copper weathervanes will patina and age when exposed to the elements. This is a completely natural reaction and will not affect the integrity and durability of the product. To help keep the copper weathervane in its original finish, we suggest regularly applying a fresh top coat of clear yacht varnish.
We recommend that all weathervanes are installed by a qualified tradesperson, who assess the installation location for suitability. Due to their decorative nature and material, they are not always suitable for coastal locations or locations which receive excessively high winds or storm like conditions. We recommend inspecting your weathervane yearly to ensure any necessary maintenance is completed.
Our bracketed weathervanes come in three sizes – miniature, standard and large. The bracket supplied on all three sizes is universal meaning it can be mounted either horizontally or vertically, depending on your desired weathervane placement. Which size is best for your property depends on a few factors, as well as the overall look you are aiming to achieve. If your property features a cupola, or domed peak at the summit of a roof, the deep black of the iron will be silhouetted against the open sky. A standard sized weathervane is perfect in this case, as it will easily be seen when fitted. If you are wanting to place on sheds or fences, the miniature size is best.
If you are mounting your weathervane to a roof apex or side of a building, barn or shed it is more likely that the vane may be lost in the background, particularly with dark brickwork or foliage behind it. A large size, or hand painted weathervane, may be a better option in this scenario. You may also want to consider a copper vane as these are bright and reflective, but will oxidise and darken in finish over time for a vintage or antique look. If affixing to a ridged roof, you will need to purchase a ridged affix bracket, a separate entity.
Please note that, with many of our more elaborate weathervane concepts, design takes precedent over functionality as achieving accurate readings in most urban areas can prove challenging regardless of design. With these weathervanes, you will not have the same level of accuracy or responsiveness you would achieve with the likes of a wind measurement device such as a wind sock.
Alternatively, if you do not want to fix to sheds, walls or chimneys, we also offer freestanding weathervanes. Complete with the topper, fletched arrow and directional arms, this weathervane can be placed directly into the ground, perfect for rented properties or for those who do not want to use a drill and bolts.

Weathervane Installation – Cast Iron
As with any product installation, we recommend seeking the advice of a qualified tradesperson.
Before you begin the full installation process of your weathervane, we advise checking that all parts are clear of any dirt or debris. We also recommend applying a light engineering grease, such as WD40, to the shaft and within the shaft sleeve/tube. Due to their decorative nature and the materials used to create our weathervanes, they are not always suitable for coastal locations or locations which receive excessively high winds or storm-like conditions. We recommend inspecting your weathervane yearly, or following any adverse weather or wind conditions, to ensure any necessary maintenance is undertaken and completed in a timely manner. To properly care for your weathervane, please refer to our ‘Weathervane Care & Maintenance Guide’ on the flip side.
WEATHERVANE POSITIONING
Please note that, with many of our more elaborate weathervane concepts, design takes absolute precedent over functionality as achieving accurate readings in most urban areas can prove challenging regardless of design. With these iron weathervanes, you will not have the same level of accuracy or responsiveness you would achieve with the likes of a lighter sheet steel design due to the heavy, robust construction. For optimum functionality, the weathervane should be clear of hedges, trees, buildings, or anything which may interfere or obstructed the wind blowing in a constant and consistent direction. If accuracy and responsiveness are of paramount importance, we would recommend the use of a windsock or other measurement devices as opposed to a cast iron weathervane.
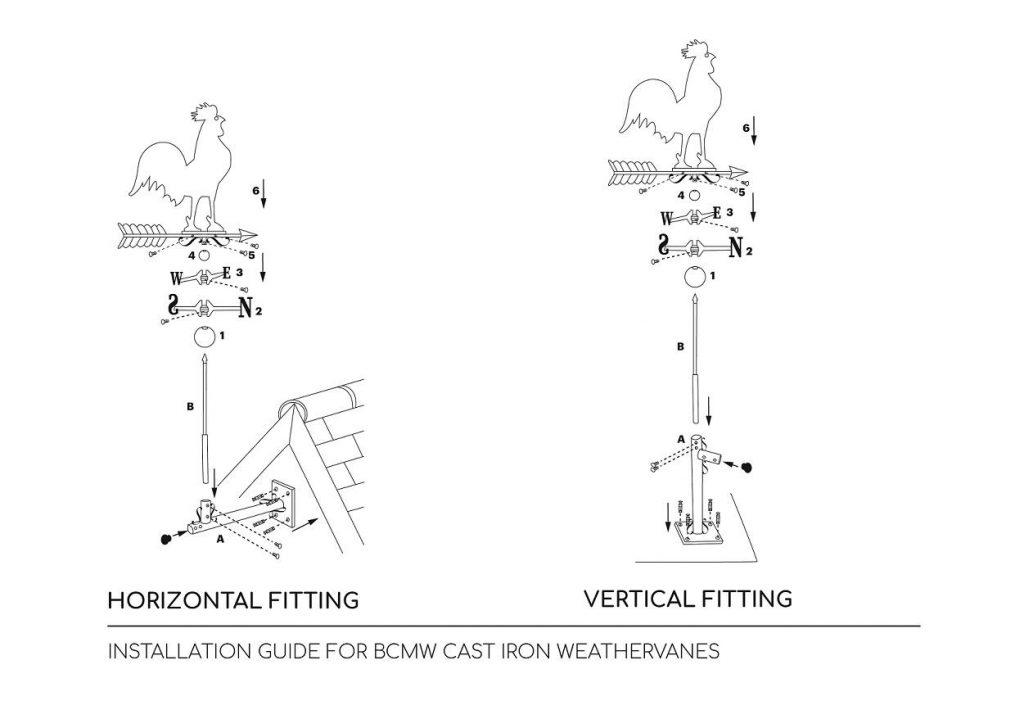
INSTALLATION OF WEATHERVANE:
For mounting both our large and standard sized weathervanes, we advise the use of a 12mm drill bit. Please note that the weathervane top is held on with a locking screw. The locking screw is there to secure the head from coming off but, equally as important, must be loose enough to allow the vane to spin freely. Please make sure you have all the components shown on the diagram before installation.
To help make installation as easy as possible, the mounting bracket (A) can be fitted either vertically or horizontally to a gable end. Once you are happy with the orientation of the bracket, using a spirit level for guidance, mark out the fixing holes for the bracket at the installation site and install using the masonry screws provided.
To fix, connect part (B) into part (A) and tighten using supplied grub screws, followed by the larger ball fitting (1).
The directional arrows should interlock into each other. North/South arrow (2) should be placed above the ball fitting (1) and then the East/West arrow (3). Using a compass, line up the North arrow in the correct position and fix grub screws into place.
Simply add the small ball fitting (4) and fix together with part (6). Part (6) (weathervane topper) is secured in place using screws (5). It is vital that this screw remains tightly fitted to ensure the topper remains in place whilst being positioned correctly to allow the weathervane to turn freely in the wind.
You are also supplied with a rubber bung which should be used to close off the part of the bracket (A) that is not being used.
Weathervane Installation – Copper
As with any product installation, we recommend seeking the advice of a qualified tradesperson.
Before you begin the installation process of your weathervane, we advise checking that all parts are clear of any dirt or debris. Our copper weathervanes have been finished in an outer lacquer to protect the copper colour of the piece. However, when exposed to the outdoor elements, this lacquer will be broken down over time allowing the copper surface to be exposed to the outside air. Copper has a unique ageing process whereby it oxidises and gradually goes a deep blue-green colour. This process does not affect the structural integrity of the metal. To find out more about the oxidation process, please refer to our Copper Maintenance Guide on the flip side.
We generally only recommend purchasing copper weathervanes if you are looking to achieve this colouration in the long-term, however the speed of the oxidisation process can be significantly reduced by regularly applying a fresh coat of yacht varnish to your piece. An annual re-varnish should be sufficient for most locations but for coastal or urban areas, we recommend varnishing every six months.
WEATHERVANE POSITIONING
Please note that, with many of our more elaborate weathervane concepts, design takes absolute precedent over functionality as achieving accurate readings in most urban areas can prove challenging regardless of design. With these weathervanes, you will not have the same level of accuracy or responsiveness you would achieve with the likes of a lighter sheet steel design due to the heavy, robust construction. For optimum functionality, the weathervane should be clear of hedges, trees, buildings, or anything which may interfere or obstructed the wind blowing in a constant and consistent direction. If accuracy and responsiveness are of paramount importance, we would recommend the use of a windsock or other measurement devices as opposed to a copper weathervane.
INSTALLATION OF COPPER WEATHERVANE:
Please note that the weathervane top is held on with a locking screw. The locking screw is there to secure the head from coming off but, equally as important, must be loose enough to allow the vane to spin freely. Please make sure you have all the components shown on the diagram before installation.
To help make installation as easy as possible, the mounting bracket (A) can be fitted either vertically or horizontally to a gable end. Once you are happy with the orientation of the bracket, using a spirit level for guidance, mark out the fixing holes for the bracket at the installation site and install using the masonry screws provided.
To fix, connect part (B) into part (A) and tighten supplied grub screws.
Add part (C) and tighten into place using part (1).
Add the larger ball fitting (2) above part (1) and add the directional arrows. The directional arrows should interlock into each other. North/South arrow (3) should be placed first above the ball fitting (2) and then the East/West arrow (4). Using a compass, line up the North arrow in the correct position and fix grub screws into place.
Simply add the small ball fitting (5) followed by part (6) (weathervane topper) and secure into place using a locking screw (6A). It is vital that (6A) remains tightly fitted to ensure the topper (6) remains in place whilst being positioned correctly to allow the weathervane to turn freely in the wind.
Shop the Range
 Click Here
